|
1 | | -# 初始化操作系统 |
| 1 | +# 初始化操作系统 |
| 2 | + |
| 3 | +Ok,我们安装好了CentOS系统,可以使用SSH工具连接上去进行尝试了,我推荐使用 [XShell] 这款工具,支持中文,还有一些主题使用。 |
| 4 | + |
| 5 | +现在我们还不知道CentOS的IP是无法连接的,所以先在虚拟机中启动CentOS。 |
| 6 | + |
| 7 | +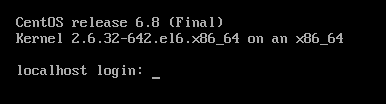 |
| 8 | + |
| 9 | +这里账户输入 `root` 密码是你在安装的时候设置的。 |
| 10 | + |
| 11 | +## 网络配置 |
| 12 | + |
| 13 | +这时候我们键入 `ifconfig` 查看ip |
| 14 | + |
| 15 | +```bash |
| 16 | +[root@localhost ~]# ifconfig |
| 17 | + |
| 18 | +lo Link encap:Local Loopback |
| 19 | + inet addr:127.0.0.1 Mask:255.0.0.0 |
| 20 | + inet6 addr: ::1/128 Scope:Host |
| 21 | + UP LOOPBACK RUNNING MTU:65536 Metric:1 |
| 22 | + RX packets:0 errors:0 dropped:0 overruns:0 frame:0 |
| 23 | + TX packets:0 errors:0 dropped:0 overruns:0 carrier:0 |
| 24 | + collisions:0 txqueuelen:0 |
| 25 | + RX bytes:0 (0.0 b) TX bytes:0 (0.0 b) |
| 26 | +``` |
| 27 | + |
| 28 | +发现还没有,我们需要设置一下网卡配置。 |
| 29 | + |
| 30 | +```bash |
| 31 | +[root@localhost ~]# vi /etc/sysconfig/network-scripts/ifcfg-eth0 |
| 32 | +``` |
| 33 | + |
| 34 | +使用 `vi` 命令编辑第一块网卡的配置 |
| 35 | + |
| 36 | +```bash |
| 37 | +DEVICE=eth0 |
| 38 | +HWADDR=00:0C:29:50:58:BE |
| 39 | +TYPE=Ethernet |
| 40 | +UUID=58f93b51-314d-49bb-9db2-036bf91161fb |
| 41 | +ONBOOT=no |
| 42 | +NM_CONTROLLED=yes |
| 43 | +BOOTPROTO=dhcp |
| 44 | +``` |
| 45 | + |
| 46 | +只需要将 `ONBOOT` 修改为 `yes` ,然后保存。 |
| 47 | + |
| 48 | +```bash |
| 49 | +[root@localhost ~]# service network restart |
| 50 | +Shutting down interface eth0: [ OK ] |
| 51 | +Shutting down loopback interface: [ OK ] |
| 52 | +Bringing up loopback interface: [ OK ] |
| 53 | +Bringing up interface eth0: |
| 54 | +Determining IP information for eth0... done. |
| 55 | + [ OK ] |
| 56 | +``` |
| 57 | + |
| 58 | +这时候我们再查看一下ip |
| 59 | + |
| 60 | +```bash |
| 61 | +[root@localhost ~]# ifconfig |
| 62 | +eth0 Link encap:Ethernet HWaddr 00:0C:29:50:58:BE |
| 63 | + inet addr:192.168.100.128 Bcast:192.168.100.255 Mask:255.255.255.0 |
| 64 | + inet6 addr: fe80::20c:29ff:fe50:58be/64 Scope:Link |
| 65 | + UP BROADCAST RUNNING MULTICAST MTU:1500 Metric:1 |
| 66 | + RX packets:302 errors:0 dropped:0 overruns:0 frame:0 |
| 67 | + TX packets:189 errors:0 dropped:0 overruns:0 carrier:0 |
| 68 | + collisions:0 txqueuelen:1000 |
| 69 | + RX bytes:33591 (32.8 KiB) TX bytes:29591 (28.8 KiB) |
| 70 | + |
| 71 | +lo Link encap:Local Loopback |
| 72 | + inet addr:127.0.0.1 Mask:255.0.0.0 |
| 73 | + inet6 addr: ::1/128 Scope:Host |
| 74 | + UP LOOPBACK RUNNING MTU:65536 Metric:1 |
| 75 | + RX packets:0 errors:0 dropped:0 overruns:0 frame:0 |
| 76 | + TX packets:0 errors:0 dropped:0 overruns:0 carrier:0 |
| 77 | + collisions:0 txqueuelen:0 |
| 78 | + RX bytes:0 (0.0 b) TX bytes:0 (0.0 b) |
| 79 | +``` |
| 80 | + |
| 81 | +网卡的配置已经被应用到了,我们CentOS的IP是 `192.168.100.128` 你的可能和我不一样,那这个192.168.100开头的网段是在哪里设置的呢? |
| 82 | + |
| 83 | +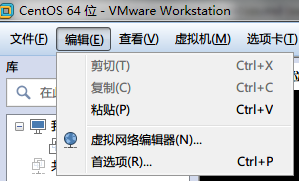 |
| 84 | + |
| 85 | +点击虚拟网络编辑器 |
| 86 | + |
| 87 | +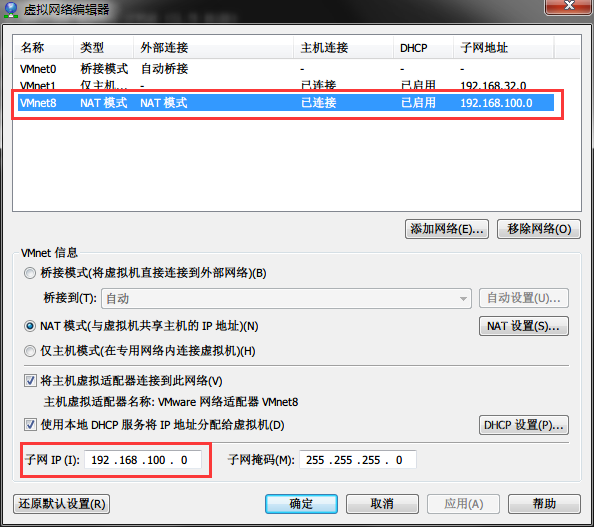 |
| 88 | + |
| 89 | +如果你在执行 `service network restart` 的时候失败可以在这里修改一个网段试试。 |
| 90 | + |
| 91 | +此时你已经可以使用SSH工具连接到你的CenOS主机了。 |
| 92 | + |
| 93 | +关于更详细的网络设置大家可以参考这2篇文章: |
| 94 | + |
| 95 | +- [虚拟机下CentOS 6.5配置IP地址的三种方法](http://www.centoscn.com/CentOS/config/2014/1112/4112.html) |
| 96 | +- [Vmware安装Centos NAT方式设置静态IP](http://www.centoscn.com/CentosBug/osbug/2015/1224/6568.html) |
| 97 | + |
| 98 | + |
| 99 | +## yum源设置 |
| 100 | + |
| 101 | +先安装 `wget` 工具,我们安装的操作系统mini版的,默认没有wget命令,执行以下命令: |
| 102 | + |
| 103 | +```bash |
| 104 | +yum install -y wget |
| 105 | +``` |
| 106 | + |
| 107 | +然后设置yum源,我选择的是网易的源,你也可以设置阿里的或者其他。 |
| 108 | + |
| 109 | +```bash |
| 110 | +cd /etc/yum.repos.d |
| 111 | +mv CentOS-Base.repo bak-CentOS-Base.repo |
| 112 | +wget http://mirrors.163.com/.help/CentOS6-Base-163.repo |
| 113 | +yum clean all |
| 114 | +yum makecache |
| 115 | +``` |
| 116 | + |
| 117 | +安全性的配置在这里先不讲解,我们先用 `root`账户来操作。 |
| 118 | + |
| 119 | +## links |
| 120 | + * [目录](<README.md>) |
| 121 | + * 上一节: [在虚拟机里安装centos6](<virtual-machine-install-centos6.md>) |
| 122 | + * 下一节: [安装jdk环境](<install-jdk.md>) |
0 commit comments